Wednesday, October 30, 2013

Make Your Own Custom Stamped Fabric!

Hey guys! Today I'm going to share with you a very simple way to transform boring or uninspiring fabric into something new with the use of stamping. 

 SUPPLIES:
  • Fabric Paint I used Pebeo Setacolor opaque in Cherry and Spring Green
  • Fabric knit or woven, any fabric will do
  • Vinyl or rubber eraser, or a potato
  • Craft felt or a sponge roller to apply the fabric paint to the stamp
  • Craft knife
  • Iron
  1. Carve your stamp out of the eraser or potato using your craft knife. I used a potato, but the person I was crafting with used vinyl erasers. I found the potato gave a more textured, worn look, while the vinyl was smoother and more consistent.
  2. You will have to create a separate stamp for each colour you wish to use, so keep this in mind when you are designing your pattern. For my project, I wanted to make an apple print to create my Felicity Fox Halloween costume. Therefore I had to make one apple shaped stamp to be printed in Cherry, and one stem and leaf stamp to be printed in Spring Green.
  3. When you are satisfied with your stamps, apply the fabric paint by rolling it on with a sponge roller, or sponge brush, even a clean kitchen sponge will do, or you can apply the paint to a folded piece of craft felt and use it as a stamp pad. 
  4. Create the pattern one colour at a time, ideally letting the paint dry between colours. When all the colours are dry, iron the fabric according to its fibre type. This will set the paint and make it both washable and permanent.
I loved this project so much! I also think it would be fun to use this method to create custom gifts on tea towels or an apron or something. The possibilities are endless!

Happy Stamping!
XO_BITS

ps
If you are interested to see the dress I created with the fabric, click here.

Tuesday, October 29, 2013

Roasted Garlic and Butternut Squash Soup

I remember the first time I tried butternut squash soup. I was in highschool and it was the soup special of the day. I was on a huge soup kick at the time and a vegetarian so I figured I'd try it, I mean, it had butter in the name, how bad could it be? It was love at first bite, and it's been one of my favorite soups ever since. 
This soup turned out super delicious! The garlic added a nice harvest-y touch and the sour cream made it just tart enough to be refreshing. I definitely recommend you give it a go whether you just have a butternut squash laying around, or if you have the yearning to eat for the season!

INGREDIENTS:
  • 1 large butternut squash
  • olive oil
  • 1 large onion
  • 2 tbsp cinnamon
  • 1 tsp ground ginger
  • 1/4 tsp ground cloves
  • 1/2 cup sour cream
  • 1-2 cups vegetable broth

DIRECTIONS:


  1. Cut squash in half and scoop out the insides.
  2. Pull all the layers off the outside of a head of garlic and cut 1/2 cm off the top of the entire head.
  3. Drizzle oil over the entire squash and into the head of garlic.
  4. Bake at 425 F for 45 minutes to an hour, or until soft with pushed with a fork.
  5. While the squash is cooking, sautee one large onion.
  6. Scoop the squash out of its shell when it is cool enough to handle and into a blender or food processor. Add the sauteed onion and remove the shells from the garlic cloves and blend them all together until smooth. *if you like the texture of squash, feel free to leave a portion of the squash unblended.*
  7. Transfer the contents into a large soup pot and simmer on medium low, adding all of the spices.
  8. Stir sour cream into soup shortly before serving. *I usually add more sour cream to my individual bowl;)*
  9. Enjoy!

Let me know if you give it a try, or if you have any great suggestions!
Thanks for reading :)

XO_BITS


Friday, October 25, 2013

Slow Cooker Mission-Style Chicken Burritos

Joel and I are both serious burrito fans. We buy coupon books just so that we can get deals on coupons. How does that even make sense. It got serious enough that I decided it was time to make our own. After searching the web and various crock pot recipe books, I decided to whip something up using elements from various sources. 

INGREDIENTS:
  • 2 frozen skinless, boneless chicken breasts
  • 1 onion- chopped
  • 1 cup salsa- add a little more if you use the extra chunky stuff
  • 1/3 cup hot sauce- I like my food spicy, maybe pipe that down if you can't take the heat ;)
  • 2 cloves garlic- chopped
  • pepper to taste
*optional ingredient- Mrs. Dash southwest chopotle spice- I love Mrs. Dash so I use it, but it isn't neccesary*

DIRECTIONS:


  1. Combine all ingredients in slow cooker and stir coat the chicken and mix the ingredients. Cook for 3 hours on high heat without removing the lid.
  2. Remove the lid after three hours to stir the ingredients and ensure nothing is sticking to the edge. If you find the ingredients are looking dry you can add about an ounce of water to the pot. Turn heat down to low and continue to cook for 2 more hours without removing the lid.
  3. Using two forks shred the chicken. It will naturally fall apart and into perfect shredded morsels. Stir the chicken with all the other ingredients in the pot and put the lid back on.
  4. Allow chicken to sit on the "Stay warm" setting for 20 minutes before serving.

While the chicken is cooking, throw on some Spanish rice. I used this recipe which involves thoroughly rinsing the rice before browning it and finally mixing it with a tomato, onion, garlic and jalepeno sauce and baking it in the oven for 40 minutes. It turned out perfect- although pretty spicy.
Finally, stack it all into your burrito with other burrito ingredients such as salsa, cheese, guacamole, sour cream, pico de gallo, refried beans, black beans- whatever your heart desires!

I love this burrito so much, I didn't even take a picture of it wrapped up because I ate it too fast. The chicken always turns out super flavorful and juicy- and let's be honest, you can never go wrong with cheese and sour cream.

Enjoy! Let me know if you try it out!

XO_BITS

Wednesday, October 23, 2013

DIY No Sew Fox Tails

Finally our Fantastic Mr. Fox costumes are coming along. I finished our fox ears last week and today our tails, so now I just have to get my mad thrift on to find Joel a suit that matches Foxy's and draft, sew and block print myself a dress before the 31st. Seems logical, right? I work better under pressure anyway ;)
So here it is- a super easy, quick, no sew tutorial to make your own faux-fur fox tail!
If you left an opening to stuff your tail, be sure to glue it up to avoid losing stuffing throughout your Halloween-ing. In case you're wondering, I used scrap faux fur to stuff my tail because I didn't have any cotton stuffing, but any sort of stuffing will do. When you're tail is finished, use a safety pin to attach it to your costume. And that's it! Fox tail in less than an hour! 
Now if you'll excuse me- I have some thrifting to do!

Happy Crafting!
XO_BITS

ps: see the finished costume here

Monday, October 21, 2013

I'm Feeling 22, Scared and Thankful

October 21 officially marks the beginning of my last month as a 22 year old. That means I can only sing "22" for 30 more days and then *poof* I'll be 23. It's okay though, T Swift herself isn't 22 anymore. So there.
 Anywho, this weekend was a bit of a tough one for me. My lovely roommate Abraham left our little town to go get his car which is about 10 hours north east in a town called Revelstoke. It's kind of a long story about how it got there, but the fact remains that he had to go retrieve it, or at least deal with it so that he could stop paying over $100 a month insurance on a car he isn't even driving. We went on a mini road trip to drop him off at the main highway. He's hitch hiking up there to get it, and has brought barely any resources with him in terms of money and food. He's one of those- do it now, deal with the consequences later- kinda guy.
 All in all it makes me worried and a bit sad, I hate saying goodbye, even when it's only temporary. I mean, I know he'll be fine, but all this uncertainty is just unsettling. But then again, I think this is all part of our early 20's. We don't know where we fit in this world, what our roll is supposed to be in it. Sometimes you just have to spread your wings and get out there and feel something new, something raw. Sometimes I wish we could just skip past this scary, mysterious part of life and head straight into full 30 year old adulthood, but the thought of that scares me almost more.
In other news, while I was driving Aber out to the main highway, being all sad and whatnot, my DIY No-Sew Fox Ears pin got repinned 100 times, the blog post itself viewed almost 500 times in one weekend. That, my friends, is a wonderful feeling. It makes me incredibly happy to know that I am creating something inspirational. So thank you so much for reading this little blog I have started. It really fills me with joy, and helps me forget that my dear friend is fending for himself out there in the wild.
I think I'll just try and enjoy this last month as much as possible. And look for a new song about being 23 hehe.
Thanks so much for reading- I mean it.
XO_BITS

Friday, October 18, 2013

A Nearly Disastrous, Yet Succulent Occasion...

I had this planter on my back porch that held an array of succulents and that was accidentally broken this week. After a short panic that I had no suitable planters, I remembered that I have been planning to use eggshells as mini planters for propagating succulents. I figured they would work perfectly for the poor little succulents that had just been uprooted and really in need of a new home. It's getting a little cold out anyway, and as most of them are still pretty little, it's probably a good thing that I was forced to find them a new home. You know, silver lining.
 
I had one globe light fixture laying around to use for the bigger plants, and the little ones fit perfectly in their new homes. I'm still going to propagate some of my other succulents though. If you don't know what propagating is, it's basically a process that involves removing all of the individual leaves of one succulent plant, and creating new little plants out of each one of them. Succulents are amazing that way, an entire new plant can be grown from one little leaf. It literally enables you to multiply your garden without spending any money. Add some cute planters and you have amazing gifts too! 
I'm happy they are all okay, or at least seem to be so far. I've moved them inside to a new home at the windowsill next to this lovely lady:
They seem like the perfect match! I hope I my new windowsill garden will remind me to get on some propagation this weekend! Is that even a word? I dunno. I do know that the weather has been absolutely gorgeous on the west coast lately, I'm thrift shopping for costume bits tomorrow, and I got to get to a pumpkin patch stat!

Happy Friday, everyone! I hope you all have marvelous weekends!
XO_BITS


Thursday, October 17, 2013

Yarnlovin' With KnitPicks

A couple weeks ago I was scanning the web for luxurious yarn made of natural fibres, but also that I can afford. I love natural fibres(such as cotton, wool, and silk) because they react to the human body better than synthetic fibres. They are breathable, unlike synthetic fibres, and so they are able to wick away moisture and keep you cool in hot weather. Wool is a natural insulator and although repels water, the scaly fibres(much like human hair that you see in closeups on shampoo commercials) are able to hold heat and keep the wearer (or sheep) warm. Cotton is the only fibre that gets stronger when wet. I'm telling you, natural fibres are cool shit.
So as I was searching, I came across knitpicks.com. I was honestly hooked at first glance. Along with a huge variety of natural yarns- from superwash Merino wool to Pima Cotton, they offer a palette of over 100 colours! And if all that isn't crazy enough, most of the skeins retail for around $4.00! Needless to say, I made an order that very night. And it arrived today! 
Joel's a little obsessed with Merino wool, and it's sorta really adorable to me. Textile love for the win!
I'm super excited to get my crochet on! I've made a pinboard devoted to yarn-y things that have me inspired if you wanna check it out. Can't wait to see what these beautiful little balls of joy will be made into!

XO_BITS

My First Indigo Vat

Natural indigo is one of the the world's most ancient and magical dyes. There are 4000 year old pieces of indigo-dyed hemp found in Egyptian tombs, and most denim is dyed with a synthetic chemical replica of natural indigo. It has been used by cultures around the globe, and is found naturally in equatorial countries all over the world. It's amazing that it was developed independently by all of these cultures because it is a very difficult process that is required to make dye out of the indigo plant, so much so that many cultures see it as a sacred practice that requires close communication between human and their indigo vat.

Wednesday, October 16, 2013

DIY No-Sew Fox Ears

If you've been wondering like I've been wondering, "how do I make fox ears", you've come to the right place. I'm going as Felicity Fox for Halloween and my man Joel is going as Foxy Fantastic (is that his name, or is it just Mr?, or Foxy Fox Fantastic? or is he just a Fantastic Mr. Fox? I dunno, the internet has failed me on that one).
Anywho, here is a simple No-Sew Fox Ears Tutorial for anyone who needs fox (or any animal with a swap of colour) ears.

SUPPLIES:

DIRECTIONS:

Decide what size and shape you want your ears to be in relation to your face/hair, etc. When you are satisfied with your shape, cut it out and call it orange. Trace this shape again and divide into a white inner ear and a black tip. I cut my white a slight bit smaller so that the orange could wrap around the front a bit. When you are ready, cut the fur out using the paper shapes as templates. Try to keep your scissors close to the fabric the fur is attached to. When you cut, use short snips to avoid cutting the hair on the fur. Ensure the fur is pointed "up" when you cut out the pieces, as shown below.
Assemble the ears on the headband as shown below:
 I finished by wrapping the orange around the front a bit to give them an orange border, but it isn't necessary. Trim up the edges to give the ears the shape you want I made Joels have shorter fur and mine more wispy and feminine. And VOILA! There you have some easy, no-sew, no-fuss, reusable fox ears!
 Feel free to swap the colours, shapes and fur-lengths to change your species! Happy crafting!
Next up: Tails!

If you're popping over from Pinterest, Welcome! My name is Bitty and this is where I share easy and cheap DIY posts, Recipes, my obsessive love of plants and random inspiration. I believe in stylish living for everyone despite how much money they have, so sit back, explore, leave some comments if you feel like it, and most importantly, Enjoy!

Are you getting excited for Halloween or what?! I sure am.
XO_BITS

ps: see the finished costume here

Tuesday, October 15, 2013

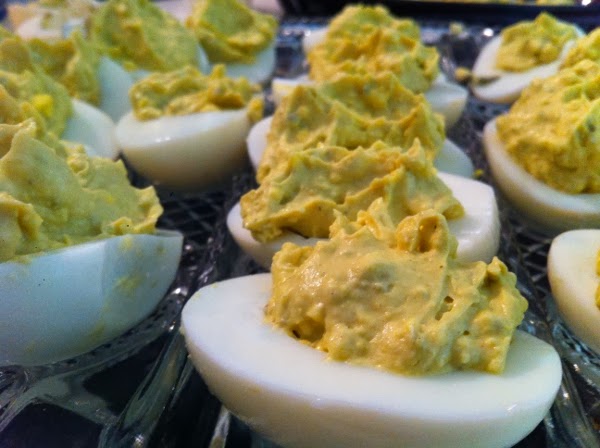
Classic Deviled Eggs

In preparation for Friendsgiving, I've been working on my Thanksgiving menu skills. First up: Classic Deviled Eggs taught from my mom! Super easy, super classic and super delicious!

INGREDIENTS:
  • 12 Eggs
  • Mayonnaise (I prefer miracle whip for plain deviled eggs like this)
  • Salt and Pepper
  • Paprika

 DIRECTIONS:

  1. Hard boil your eggs and cool until they are safe to touch.
  2. Remove the shells.
  3. Cut each egg in half lengthwise or hotdog style.
  4. Remove the yolks and mash them in a bowl with 4 heaping tbsp mayo and salt and pepper to taste.
  5. When you are satisfied with the egg to mayo to s&p ratio, fill your emptied egg whites with the mixture.
  6. Top with paprika and enjoy!


Yumm!  Can't wait to try more classic recipes, and start working on some not-so-classic decorations! ;)

XO_BITS

Monday, October 14, 2013

Happy Thanksgiving

Today we celebrate Thanksgiving in Canada. I love this holiday as it makes us take a look at the wonderful and beautiful parts of our lives. Sometimes we can get bogged down and forget how lucky we are.
This year I am thankful for so much. A cozy home, family that I can laugh with, friends that I can share with, an amazing second half, a roommate that can put a smile on my face no matter the circumstance, a bright future, and everyone that stops by this blog and encourages me to keep on it. I've enjoyed sharing and learning with all of you :).
I'm planning a Friendsgiving for a couple weeks from now. Canada's Thanksgiving is right before Halloween and I always feel like it gets a little outshone by the spooky holiday. I'm excited to gather with friends and share food together and just take some time to be thankful. My mom gave me a lesson on cooking turkey, making stuffing, etc. earlier today and I'm excited to attempt it myself! Also, we just found out that our building has an amenities room! With tons of tables and chairs and even a pool table. Perfectly in time for friendsgiving.
I made those cupcakes again due to high demand. I added ginger this time and they were super delicious!


HAPPY THANKSGIVING EVERYONE!
What are you thankful for this year?

XO_BITS

Saturday, October 12, 2013

Bake Your Own Clay

So, the other day I got this idea to make a miniature graveyard to put in my plants. Growing up, my mom would always deck out the yard with a graveyard, smoke machines, creepy music, you name it! I am feeling very nostalgic this year, I have the Halloween bug hard.
Anyway, I decided clay would probably be the easiest way to fulfill my miniature graveyard dreams. I remembered we used to make Christmas ornaments out of some make-at-home stuff as a child and decided to check the ol' internet for some tips. I came across these recipes and got straight to work.

INGREDIENTS:
  • 2 1/2 cups flour
  • 1 cup water
  • 1 cup salt
Mix all of the ingredients together with your hands and knead and mix until it reaches a smooth, clay-like consistency. You can keep the clay in a sealed bag or saran wrap in the fridge until you're ready to use it. (I'm not sure if it goes bad, the site doesn't mention it.. but I don't think it would.. flour doesn't go bad, right?)
Create to your heart's desire. When you are satisfied with your creations, bake on a baking sheet at 350 degrees Celsius until the edges are starting to look a little goldish (smaller pieces will cook faster so keep an eye on it to avoid overcooking).
I captured Joel helping my niece, Emma, from through the window on the patio.. so friggen cute <3 
After they come out of the oven, leave them to cool on a baking sheet. When they are cool, use as is, or feel free to paint your creations to add a little pizzazz. 
Such a fun and super easy way to spruce up the apartment for Halloween! There are honestly so many things you can do with this technique.. my mind is spinning with ideas. Let me know if you try it out, I'd love to see what you come up with!

Thanks for reading :)
XO_BITS

LinkWithin

Related Posts Plugin for WordPress, Blogger...