Showing posts with label food. Show all posts

Thursday, February 6, 2014

Easy Cheesy Breakfast Burrito

Today while making breakfast I realised I didn't have any bread. Bread is pretty classic in my breakfasts and so I decided I would whip up a spicy egg-y burrito of sorts. It's a really easy recipe that only uses a couple ingredients, but it's still delicious and pretty well rounded, win-win-win! This recipe is perfect if you're looking for something a little different than the classic egg and toast, but also isn't so weird that you won't eat it early in the morning.


INGREDIENTS:

  • 2 eggs
  • Hot sauce such as Sriracha
  • 1 tbsp green onions, chopped
  • 1 1/2 tbsp Water or milk
  • Whole wheat tortilla shell
  • 1/4 cup cheddar cheese, grated
  • sour cream, to taste
  • whatever else you want to add: sausage, beans, salsa, bacon, etc.

DIRECTIONS:

1. Mix together the two eggs and the water or milk and a tbsp of hot sauce (more or less depending on your preference).

2. Toss in the chopped green onions and cook on medium heat, scraping at the pan when the eggs start to turn white. Keep cooking until fully cooked through and not slimy (I like mine a little golden)

3. Prepare your tortilla with extra sriracha, sour cream and your cheddar cheese.
4. Top your tortilla with your hot scrambled eggs and close up.
I've been really enjoying eating breakfast lately. I've noticed that the more I make myself eat it, the easier it gets. I used to be one of those people who couldn't eat for the first 3 hours of being awake. Now I find myself waking up hungry! Finally, a new years resolution I actually enjoy following! haha! Click here to see the other breakfast recipes I've tried out this year.

Also! My friend Tamara taught me a cool trick for your green onions. After you cut them down and use the onion part, just place the roots and stems in a cup of water. They grow back almost instantly! Neverending onions!
Happy Burrito-ing!
XO_BITS

Tuesday, January 28, 2014

Make Your Own Breakfast Syrup

You know those days when you want French toast or crepes but you don't have any syrup? Well those days are over, friends! You can make your own syrup!!
It may seem obvious to some of you to make your own pancake syrup, but I had honestly never thought of it before (which is extra odd considering that pumpkin spice latte syrup I made- you'd think it'd naturally be the next thought to come into my mind. Sometimes these epiphanies take time I guess...). It's super easy and you probably have all the ingredients already in your cupboards. 

INGREDIENTS:

  • 1 cup brown sugar 
  • 1 cup water
  • 1 tsp maple extract (or whatever flavour you like)
  • 1 tbsp butter (optional)

DIRECTIONS:

Whisk the ingredients together in a small pot over med-low heat. Butter is optional and makes your syrup taste more savoury sweet. Bring to a slow gentle boil and continue to stir pretty consistently for about 20-30 minutes. And that's it. Pour it into a sealable container and serve hot or cool. Keep your syrup in the fridge. It should keep for a while if you didn't put any butter in it. If you did use butter, I would recommend consuming the syrup within 2 weeks. 

Yum, Aunt Jemima's got nothin' on this delicious concoction. I'm trying to cut down on my sugar intake, but I feel the beginning of the end is at hand.You can customise the flavour of the syrup by substituting the maple extract with other flavours- vanilla would be good, or a fruity flavour like blueberry, and by adding other spices. I could see cinnamon being a delicious addition.

Enjoy! XO_BITS

Tuesday, January 21, 2014

The Perfect Crêpes!

In highschool my best friend and I would make crêpes nearly daily. We would skip school to watch Clone High and make delicious crêpes with probably way too much whipped cream (when you're in highschool that's not even a thing). Our dream at the time was to one day open a crêpe shop because we just loved them so much and our friends always loved them too.

Fast forward a couple years and we used our crêpe skills to raise money for displaced children in Thailand. We ran a weekly cafe called Project Kah Feh. "Kah Feh" is how you pronounce coffee in Thai and we would book local bands, sell Thai coffee and make these awesome crêpes. We were able to raise thousands of dollars for the children, and we got to see our dreams come to fruition, even if it was in a small scale. Today, as part of the breakfast series, I thought I would share the recipe for these delicious crêpes with you.

INGREDIENTS:

- 1 cup flour
-1/2 cup milk
-1/2 cup water
-2 tbsp melted butter
-1/4 tsp salt


DIRECTIONS:

Mix all the ingredients until the batter is smooth. Heat up a non-stick skillet on medium heat and coat with butter. Pour batter into the center of the pan until it has a diameter of about 5 inches. Then lift the pan and tilt it until the batter coats the entire bottom of the pan and is about 3mm thick. Cook for about 2 minutes and then flip and cook for about 2 more minutes. Now it's time to fill them up!
There are a few combos I always use- strawberries, bananas and nutella are a fav (and whipped cream- which I didn't have today :( but they were still super delicious). Another really delicious one is butter, lemon juice and a little sugar. You can also do the classic butter and syrup. I've had really really delicious savoury crepes too- with cheese and broccoli. Basically, the possibilities are endless. You know the drill- just follow your heart. 
Once they're filled, roll em up and enjoy! But I'm warning you now, these are so delicious that you will probably be disappointed next time you go out for crepes. These are the best ones.

Enjoy and happy breakfasting!
XO_BITS

Tuesday, January 14, 2014

Breakfast: Spicy Avocado, Parmesan, and Egg Sandwich

Mmmmm can anyone say Omega 3 overload?! I love Avocados probably more than I should, considering they aren't even close to local produce, but the way they combine with the other flavours in this sandwich is just too delicious! Seriously, Joel and I eat this at least once a weekend, it's that good. Which is why it is the first recipe in the breakfast series.


INGREDIENTS:
  • 1 Egg
  • 1 Avocado
  • Parmesan Cheese (grated)
  • Sriracha or your other favorite hot sauce
  • Salt and pepper to taste
  • Mayo
  • Bread 

 DIRECTIONS:
1. Cook your egg to your liking. I usually do them over medium with a pinch of salt and dash of pepper.
2. Toast your bread and spread with mayo or butter, 'sup to you, and if we're being honest here, I do both
3. Grate some parmesan directly onto the hot toast.
4. Add your avocado.
5. Add your hot egg.
6. Top with sriracha and some more parmesan you can never have too much parmesan ;)
7. Add a top slice of toast, or leave it as is. ENJOY!


I usually slice my avocado and then scoop it out, Joel turned me on to this trick, that boys a genius

I hope you give this simple breakfast option a try. It's so delicious and so good for you too!
Enjoy and thanks for reading!

XO_BITS

Wednesday, December 18, 2013

Homemade Hot Cocoa

Hot cocoa is basically essential to this time of year. With freezing temperatures outside, sometimes the best remedy for a long, cold day of work, school, or snowball fights is a big mug of hot cocoa. Now don't get me wrong, I love a good hot toddy as much as the next girl, but nothing quite hits the spot like hot cocoa. I also love it because it's one of the things Joel loves to make. If hot chocolate isn't good enough, paired with love and good intentions it's practically heaven!

INGREDIENTS:
  • 1/4 cup sugar
  • 1 heaping Tbsp cocoa
  • 1 tsp vanilla
  • 1 pinch of salt
  • 1 tsp icing sugar
  • 3 cups milk

DIRECTIONS:

1. Mix together the 1/4 cup sugar, heaping tablespoon of cocoa and teaspoon of icing sugar. Use the back of a spoon to work out any chunks in the cocoa.

2. Add the vanilla and salt and mix.

3. Heat the milk in a small pot on medium-low heat. 

4. Paste the powdered mix (1) by adding a bit of milk(2) and giving in a good stir to get the entire mixture wet (3). This allows for easy integration later and avoids chunky, unmixed powder floating on the top of your drink.

5.Add the mixture to the pot of milk and heat, constantly stirring until hot. 

Yum! Time to wrap some presents. I made some awesome custom stamped paper and I'm stoked to share it soon!

XO_BITS

Thursday, November 14, 2013

Reese's Peanut Butter and Chocolate Chip Banana Muffins


Otherwise known as the most delicious muffins known to mankind. Seriously though. These are amazing. I mean what's not to love? Banana pairs with peanut butter and chocolate perfectly.. remember when I made 5 types of s'mores?! Banana Peanut Butter Chocolate was my favorite then too! It's a fail proof system!
One of Joel's oldest childhood friend's is responsible for this recipe. Actually, his mother is, if we're being totally truthful here (there's a great mother behind every great man). Anywho, she lives in Lake Country, about 5 hours from where we live, and we used to always go visit her every summer, even before Joel and I were dating. We would play games, go boating, tan on the beach, but the most memorable time from each trip is when she would make these muffins. I'm not kidding you people, these are to die for. We would all stuff a dangerous amount in our mouths until there were no more left and leave feeling so loved and satisfied. The perfect end to the perfect trip, every time.

Since then I've managed to get a hold of the recipe, and now I honestly buy twice the amount of bananas every time I grocery shop to ensure that I can make these lil' beauties.  Reese's peanut butter chips have become a staple ingredient in my pantry. I don't even regret it, people, they're that good!

INGREDIENTS:

  • 4 overripe bananas
  • 1 cup brown sugar
  • 2/3 cup oil
  • 2 eggs
  • 2 tsp. vanilla
  • 3 cups flour
  • 2 tsp. baking powder
  • 2 tsp. baking soda
  • 1 tsp. salt
  • 1/2 cup water
  • 1 cup chocolate chips
  • 1 cup peanut butter chips

DIRECTIONS:
1. Preheat oven to 350 degrees F. In a large bowl, mash bananas until smooth. Add sugar, oil, egg, and vanilla. Mix well.
2. Add flour, baking powder, baking soda and salt, and barely mix until moistened. *It's important not to over mix muffins or cupcakes because when flour touches water it creates gluten and over-stirring causes the gluten to over-react causing peaks and tunnels, which lead to dry muffins. You can tell if you over-stirred if you're muffins are pointy (peaks) and have long winding holes through them (tunnels)*
You can see in the second picture that it's still a little floury. That's okay! Makes for some moist muffins!
3. Add water and chips. Stir just enough to blend. Sometimes I add in other things here, like skor bits, pecans, whatevs. Follow your heart.
4. Spoon into muffin tins 2/3 to 3/4 full. Bake at 350 degrees for 20 - 25 minutes.
5. Allow to cool on a rack and enjoy! You'll probably want some milk, they're rich like that. 
You guys are gonna love these muffins, I know it, because they're perfect. Seriously, I tried to write this blog post like a hundred times, but always ate the muffins before I had time to take their picture!

Happy Baking!
XO_BITS


Tuesday, October 29, 2013

Roasted Garlic and Butternut Squash Soup

I remember the first time I tried butternut squash soup. I was in highschool and it was the soup special of the day. I was on a huge soup kick at the time and a vegetarian so I figured I'd try it, I mean, it had butter in the name, how bad could it be? It was love at first bite, and it's been one of my favorite soups ever since. 
This soup turned out super delicious! The garlic added a nice harvest-y touch and the sour cream made it just tart enough to be refreshing. I definitely recommend you give it a go whether you just have a butternut squash laying around, or if you have the yearning to eat for the season!

INGREDIENTS:
  • 1 large butternut squash
  • olive oil
  • 1 large onion
  • 2 tbsp cinnamon
  • 1 tsp ground ginger
  • 1/4 tsp ground cloves
  • 1/2 cup sour cream
  • 1-2 cups vegetable broth

DIRECTIONS:


  1. Cut squash in half and scoop out the insides.
  2. Pull all the layers off the outside of a head of garlic and cut 1/2 cm off the top of the entire head.
  3. Drizzle oil over the entire squash and into the head of garlic.
  4. Bake at 425 F for 45 minutes to an hour, or until soft with pushed with a fork.
  5. While the squash is cooking, sautee one large onion.
  6. Scoop the squash out of its shell when it is cool enough to handle and into a blender or food processor. Add the sauteed onion and remove the shells from the garlic cloves and blend them all together until smooth. *if you like the texture of squash, feel free to leave a portion of the squash unblended.*
  7. Transfer the contents into a large soup pot and simmer on medium low, adding all of the spices.
  8. Stir sour cream into soup shortly before serving. *I usually add more sour cream to my individual bowl;)*
  9. Enjoy!

Let me know if you give it a try, or if you have any great suggestions!
Thanks for reading :)

XO_BITS


Friday, October 25, 2013

Slow Cooker Mission-Style Chicken Burritos

Joel and I are both serious burrito fans. We buy coupon books just so that we can get deals on coupons. How does that even make sense. It got serious enough that I decided it was time to make our own. After searching the web and various crock pot recipe books, I decided to whip something up using elements from various sources. 

INGREDIENTS:
  • 2 frozen skinless, boneless chicken breasts
  • 1 onion- chopped
  • 1 cup salsa- add a little more if you use the extra chunky stuff
  • 1/3 cup hot sauce- I like my food spicy, maybe pipe that down if you can't take the heat ;)
  • 2 cloves garlic- chopped
  • pepper to taste
*optional ingredient- Mrs. Dash southwest chopotle spice- I love Mrs. Dash so I use it, but it isn't neccesary*

DIRECTIONS:


  1. Combine all ingredients in slow cooker and stir coat the chicken and mix the ingredients. Cook for 3 hours on high heat without removing the lid.
  2. Remove the lid after three hours to stir the ingredients and ensure nothing is sticking to the edge. If you find the ingredients are looking dry you can add about an ounce of water to the pot. Turn heat down to low and continue to cook for 2 more hours without removing the lid.
  3. Using two forks shred the chicken. It will naturally fall apart and into perfect shredded morsels. Stir the chicken with all the other ingredients in the pot and put the lid back on.
  4. Allow chicken to sit on the "Stay warm" setting for 20 minutes before serving.

While the chicken is cooking, throw on some Spanish rice. I used this recipe which involves thoroughly rinsing the rice before browning it and finally mixing it with a tomato, onion, garlic and jalepeno sauce and baking it in the oven for 40 minutes. It turned out perfect- although pretty spicy.
Finally, stack it all into your burrito with other burrito ingredients such as salsa, cheese, guacamole, sour cream, pico de gallo, refried beans, black beans- whatever your heart desires!

I love this burrito so much, I didn't even take a picture of it wrapped up because I ate it too fast. The chicken always turns out super flavorful and juicy- and let's be honest, you can never go wrong with cheese and sour cream.

Enjoy! Let me know if you try it out!

XO_BITS

Tuesday, October 15, 2013

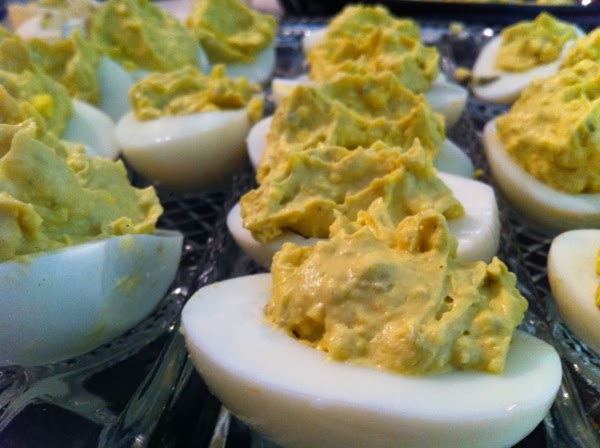
Classic Deviled Eggs

In preparation for Friendsgiving, I've been working on my Thanksgiving menu skills. First up: Classic Deviled Eggs taught from my mom! Super easy, super classic and super delicious!

INGREDIENTS:
  • 12 Eggs
  • Mayonnaise (I prefer miracle whip for plain deviled eggs like this)
  • Salt and Pepper
  • Paprika

 DIRECTIONS:

  1. Hard boil your eggs and cool until they are safe to touch.
  2. Remove the shells.
  3. Cut each egg in half lengthwise or hotdog style.
  4. Remove the yolks and mash them in a bowl with 4 heaping tbsp mayo and salt and pepper to taste.
  5. When you are satisfied with the egg to mayo to s&p ratio, fill your emptied egg whites with the mixture.
  6. Top with paprika and enjoy!


Yumm!  Can't wait to try more classic recipes, and start working on some not-so-classic decorations! ;)

XO_BITS

Monday, October 7, 2013

Happiness is a Warm (pumpkin spice) Latte

Coffee in the morning. Probably one of my favorite parts of life. Add some homemade pumpkin spice latte syrup and I will never have to leave home! Seriously though, this syrup is absolutely amazing-- so pumpkiny but not too bitter and the perfect amount of sweet and spice. I got the recipe over at A Beautiful Mess. Those ladies seriously know how to put a smile on my face.

SPICES:
NOT SHOWN: The ABM girls also suggest using 1/2 tsp ground ginger, I didn't have any
OTHER INGREDIENTS:
  • 2 cups Water
  • 4 heaping tbsp Pumpin Puree
DIRECTIONS
  1. Combine all ingredients in a small pot allowing all the spices and sugars to dissolve. Continue to cook at lowish-medium heat for about 5 minutes without allowing the mixture to boil.
  2. The ABM girls suggest straining your mixture through a fine metal mesh sieve, I don't have anything of the sort and tried to use muslin but it was just too fine so I just left it chunky. It hasn't bothered me yet but I'll probably leave the bottom inch of the bottle unused where all the chunks settled.
  3. Put in an airtight container and store in the fridge. The ABM girls suggest that it will stay fresh for about 2 weeks in the fridge.

NOW FOR THE LATTE PART:

I don't have an espresso machine so I had to get creative for this part. I fill my mug about half-full with milk and put it in the microwave for a minute (you can also use the stove top if microwaves freak you out). When it's all hot I add about a tablespoon of the syrup and whisk it all good so it gets foamy. Meanwhile I brew a nice strong pot of coffee. Then I top off my half-full foamy mug of pumpkin milk with the strong coffee while continuing to whisk. YUM. Pumpkin Perfection.

I love this spice, it's almost perfect (probably would  be if I had ginger haha). I think it would probably also taste good with milk and Kahlua for a Thanksgiving drink! Don't forget to visit A Beautiful Mess to see all of the other amazing projects they come up with.

Thanks for reading, let me know if this works for you, or if you have any other pumpkin spice tricks up your sleeve that you're willing to share!

Also I updated my About page if you wanted to check it out ;)

XO_BITS

Thursday, October 3, 2013

Pumpkin Cupcakes with Cream Cheese Frosting

Okay so, before I start telling you how to make these, you should first know that I am by no means any sort of a professional, as a matter of fact, this was my first try at making pumpkin cupcakes. I just follow rules fairly well (edit: after writing the ingredients I realized I don't actually follow rules very well, but these still turned out great... so just follow your heart.) And you can too! And then we can be novice bakers who make delicious pumpkin cupcakes together! YAY!

I pinned this recipe the other day from The Spiced Life, who strongly based the recipe on  Martha Stewart's Cupcakes. That's how you know it's gonna be delicious, Martha doesn't muck about!

CUPCAKE INGREDIENTS:
  • 4 cups flour (The Spiced Life recommends 'Cake Flour', I don't know what that is and used regular flour)
  • 1 tsp baking soda
  • 4 tsp baking powder
  • 2 tsp cinnamon (She recommends Ceylon Cinnamon, but I ain't that fancy)
  • 1 tbsp ground ginger (I skipped this and it was still delicious)
  • 1/2 tsp grated nutmeg (She recommends fresh, ain't nobody got time for that)
  • 1/2 ground cloves
  • 1 cup butter, room temperature. (She actually recommends using unsalted butter and then adding "1 tsp of finely ground sea salt, but I just skipped the salt and used regular butter and they are delish)
  • 2 1/2 cups packed brown sugar
  • 4 large eggs
  • 1 tsp vanilla
  • 1 cup full fat buttermilk
  • 1 1/2 cans pumpkin puree (The recipe actually calls for 1 1/2 cups of canned puree.. I thought it said 1 1/2 cans, so I added about 600 ml which is actually over two cups.... but I promise they turned out perfect!)
FROSTING INGREDIENTS:
  • 1 cup butter (again, she recommends unsalted, I used salted)
  • 16 oz cream cheese, room temp (16oz = 2 cups)
  • 4 cups confectioners sugar (aka icing sugar)
  • 1 tsp vanilla
These things are amazing, seriously NO cupcake is stuck to the liners when you remove them, it's magical 

INSTRUCTIONS: 

    1. Preheat the oven to 350 F. Line your muffin tins with liners, Spiced Life recommends spraying lined tins with a non-stick spray, I used Paper Chefs Parchment paper liners which are super non-stick so I skipped that step.
    2. Whisk together the flour, baking soda and baking powder. Set aside.
    3. Beat the butter until creamy with the spices. Add the brown sugar and beat until lightened and fluffy. Scrape down the sides of the bowl. FYI I don't have a stand or hand mixer and did all of the mixing with my own arms.. okay I used Joel's arms. 
    4. Add the eggs one at a time, beating well after each addition and scraping the sides and bottom of the bowl as needed. Add the vanilla and beat that in.
    5. Add the flour mixture in 4 additions, the buttermilk in 3 additions, alternating, beginning and ending with the flour mixture. Keep the mixer speed at low for this. Or tell your bf to mix slower.
    6. Add the pumpkin puree. Beat until just combined.
    7. Fill the liners ¾ full. (It is fine if some of the batter needs to wait on the counter because you don’t have enough muffin pans for all of the cupcakes to bake at once.)
    8. Bake for 15-18 minutes, rotating front to back and top to bottom halfway through. The cupcakes are ready when they are golden brown and a toothpick inserted into the center of a cupcake comes out clean or with only a few crumbs attached.
    9. Let the cupcakes cool in the pans for 5 minutes and then turn them out onto a cooling rack to cool completely.
    10. FROSTING: beat the softened butter and cream cheese until creamy and completely blended. Add the vanilla and beat in. Then add the powdered sugar, ½ cup at a time, beating until the frosting is creamy, somewhat fluffy.
    11. Frost the completely cooled cupcakes. I added "Autumn Mix" candies to the top, which I found in the bulk section at my local Canadian Superstore.


Seriously, these turned out so delicious. Which is surprising to me now that I'm re-reading and realizing I did so much wrong! Perhaps it's an autumn miracle! No complaints here! Try these out my way, or follow the original  recipe with probably better results!

Happy Autumn everyone, and happy baking!

XO_BITS

Wednesday, September 4, 2013

Almost-Autumn Roasted Pototoes and Yams

Soo, I know it's not technically autumn yet. As a matter-of-fact I downright defend summer's last stand against all fall-faring naysayers! However, Joel loves yams. And yams are defs an autumn food. 


Which brings us to Almost-Autumn Roasted 'Tates. These bad boys are some of the best comfort food. But be warned! They will make your house smell like autumn, and you may find yourself going autumn-crazy just from the smell! Scarves! Boots! Pumpkin Spice Lattes! I swear I still love you summer... (I'd also like to take this time to apologize for the bad quality photos... my camera fell off the coffee table lens-first and is having a real hard time focusing. It's heartbreaking but I think it's just a lens issue.. which isn't soooo bad, so I'm using an iphone).

Tuesday, June 11, 2013

5 Ways To Make S'mores!

fuZGo7 on Make A Gif, Animated Gifs
The first time I went camping, there was a definite shortage of s'more-age. I made up for it the second time by eating twice as many s'mores as anyone probably should. Just short of a sugar induced coma, I created 5 different types of s'mores, and it pretty much changed my life. Let me introduce you to the line up:

Friday, May 31, 2013

Jello Shots in Oranges & 5 Minute Hobo Packs

Every year on Joel's birthday we go camping; his birthday is on June 1st, which is probably one of the most exciting days of the year as it sort of unofficially announces the commencement of summer, and it's the perfect time of the year to spend with our friends in the woods. I've been spending the last couple of days getting prepared.
I got inspired to make jello shots by Emma at A Beautiful Mess. It's awesome because you make them inside a citrus fruit, such as an orange, and then you can cut the orange into slices once the jello jellifies- jello slices! It's genius!

LinkWithin

Related Posts Plugin for WordPress, Blogger...